Welcome to our guide on making delicious No Knead Artisan Bread! If you’re looking for easy bread recipes that result in homemade bread with a crusty exterior and a chewy crumb, you’ve come to the right place. In this article, we will walk you through the step-by-step process of creating this bread masterpiece. Whether you’re a beginner or an experienced baker, this recipe is forgiving and will produce bakery-quality results, right in your own kitchen.
No Knead Artisan Bread requires minimal effort and uses basic ingredients like yeast, flour, salt, and water. The best part? You don’t need to knead the dough or use a stand mixer. The dough is mixed together, left to rise for a specific period, and then baked to perfection. It’s that simple! With this versatile recipe, you can enjoy freshly-baked bread straight from the oven, use it for sandwiches, or pair it with your favorite soups and stews.
So, let’s dive in and learn all about this wonderful bread-making technique. Get ready to become a master artisan baker in no time!
Key Takeaways:
- No Knead Artisan Bread is an easy bread recipe that requires minimal effort.
- The dough is forgiving and can be left to rise for varying amounts of time.
- Basic ingredients like yeast, flour, salt, and water are used.
- It does not require kneading or the use of a stand mixer.
- No Knead Artisan Bread can be enjoyed fresh out of the oven or used for a variety of dishes like sandwiches and soups.
Why No Knead Artisan Bread is Easy and Forgiving
No Knead Artisan Bread is a perfect choice for those looking for easy bread recipes that don’t require kneading. It is a forgiving dough that gives you the flexibility to choose rise times that suit your schedule. Let’s explore the reasons why this bread recipe is so forgiving.
No Kneading or Stand Mixer Required
One of the reasons why No Knead Artisan Bread is so easy is that it doesn’t require any kneading. You can simply mix the ingredients together, let the dough rest, and it will do all the work for you. This makes it accessible to beginners and experienced bakers alike. Plus, you don’t need a stand mixer or any fancy equipment. All it takes is 3 minutes of active effort.
Flexible Rise Times
No Knead Artisan Bread allows you to have control over the rise times. You can let the dough rise for as little as 2 hours or up to 3 days. This flexibility means you can fit the bread-making process into your busy schedule. Whether you want to bake bread in a few hours or a couple of days, this recipe has got you covered.
Variety of Yeast Types
Another reason why this bread recipe is forgiving is that it’s compatible with different types of yeast. You can use Rapid Rise or Instant Yeast, as well as normal yeast or Active Dry Yeast. The order of steps may vary depending on the yeast type chosen, but the result will still be a delicious loaf of bread.
| Yeast Type | Rise Time |
|---|---|
| Rapid Rise or Instant Yeast | 2-3 hours |
| Normal Yeast or Active Dry Yeast | Overnight or up to 3 days |
Bread Flour or Normal Flour
While bread flour is recommended for the best results, normal flour can also be used to make No Knead Artisan Bread. Bread flour has a higher protein and gluten content, which results in a more elastic and chewy texture. However, if you don’t have bread flour on hand, you can still achieve delicious results using normal flour.
“No Knead Artisan Bread is a forgiving recipe that welcomes experimentation and variations. Feel free to get creative with your ingredients and toppings to tailor the bread to your taste.”
The Altitude and Its Effect on Rise Times
It’s important to note that rise times may vary depending on the altitude where you are baking. Higher altitudes may require longer rise times, while lower altitudes may require shorter rise times. It’s always a good idea to keep an eye on the dough and adjust the rise times accordingly.
No Knead Artisan Bread’s forgiving nature and easy process make it a foolproof option for homemade bread lovers. Whether you’re a beginner or an experienced baker, you’ll enjoy the simplicity and delicious results that this recipe offers.
The Process of Making No Knead Artisan Bread
When it comes to making No Knead Artisan Bread, the process is straightforward and requires a few key steps. Let’s take a closer look at each stage:
Mixing the Dough
Begin by combining flour, salt, and yeast in a mixing bowl. Add warm water to the mixture and stir until all the ingredients are well incorporated. The resulting dough will be wet and sloppy, with a consistency that is not kneadable.
Rising Time for Flavor Development
Cover the bowl with a kitchen towel or plastic wrap and leave it in a warm place to rise for approximately 2 hours. During this time, the dough will double in volume and become bubbly and wobbly. For a stronger flavor, you can refrigerate the dough for at least 8 hours, up to 3 days.
Shaping the Dough
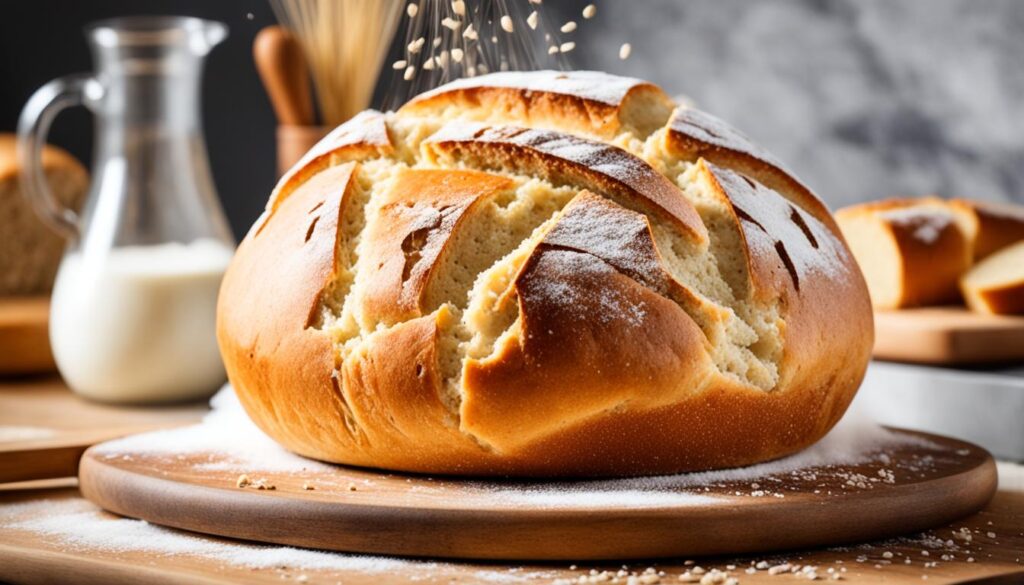
After the rising period, scrape the dough out onto a floured work surface. Fold the edges of the dough inwards to deflate it gently. Then, flip the dough onto a piece of parchment paper and reshape it into a round or oval shape. This shaping process helps to create an appealing final loaf.
Baking in a Dutch Oven or Alternative Method
Preheat a Dutch oven in the oven, as this will create a steamy environment that promotes proper rise and crust development. Carefully transfer the shaped dough, along with the parchment paper, into the preheated Dutch oven or onto a baking tray. Alternatively, if you don’t have a Dutch oven, you can use a tray with a pan of hot water in the oven to create steam.
The Final Bake
Place the covered Dutch oven or baking tray into the preheated oven. Bake the bread with the lid on for 30 minutes, as this will create the steam necessary for a good rise. Then, remove the lid and continue baking for an additional 12 minutes to allow the crust to brown and become crisp.
Cooling and Enjoying
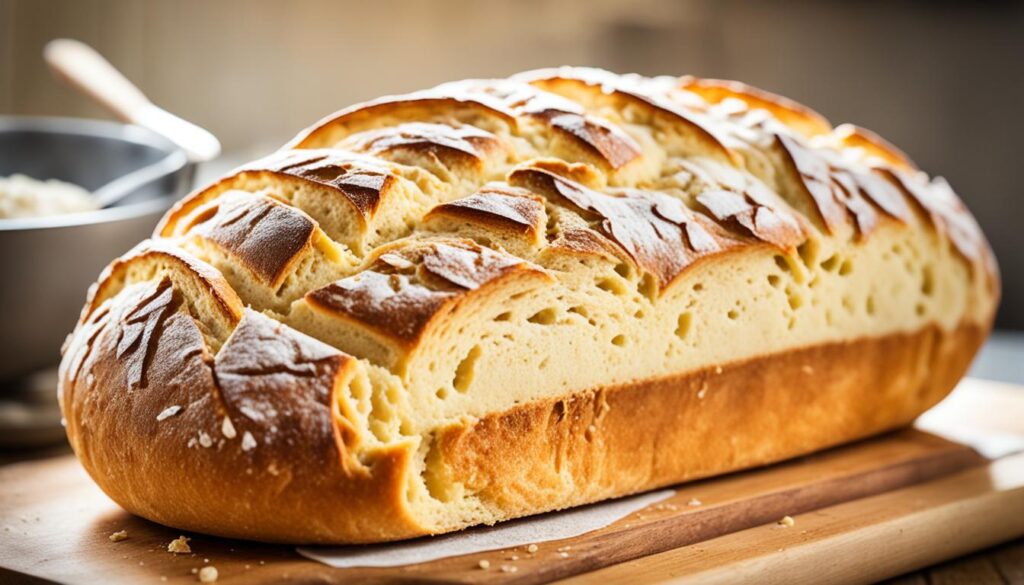
After baking, it’s important to allow the bread to cool for at least 10 minutes before slicing. This ensures even cooking and helps the flavors to settle. Once cooled, you can savor your homemade No Knead Artisan Breadâcrusty on the outside, with a moist and chewy crumb inside.
| Key Steps | Details |
|---|---|
| Mixing the Dough | Combine flour, salt, yeast, and warm water until well mixed. |
| Rising Time | Let the dough rise for 2 hours at room temperature or refrigerate for enhanced flavor development. |
| Shaping the Dough | Gently deflate the dough, reshape it into a round or oval shape on parchment paper. |
| Baking in a Dutch Oven | Preheat the Dutch oven, transfer the shaped dough, and cover with the lid while baking. |
| Alternative Baking Method | If a Dutch oven is not available, bake the bread on a tray with a pan of hot water to create steam. |
| Final Bake | Bake with the lid on for 30 minutes, then remove the lid and bake for an additional 12 minutes to brown the crust. |
| Cooling and Enjoying | Allow the bread to cool before slicing and savoring the delicious flavors. |
Tips for Making No Knead Artisan Bread
To achieve the best results when making No Knead Artisan Bread, there are several tips to keep in mind.
The dough should be loose and sticky, as this allows for better rise and the development of big air pockets. If the dough is too stiff, additional water can be added, while extra flour can be added if the dough is too wet. Adjusting the consistency of the dough is crucial for obtaining the desired texture.
Common troubleshooting issues such as dough not rising or rising too quickly can be resolved by adjusting the dough’s environment. If the dough is not rising, try moving it to a warmer place to provide the yeast with the ideal conditions for fermentation. On the other hand, if the dough is rising too quickly, refrigerating it for a shorter time can help slow down the fermentation process.
Using a Dutch oven is recommended for baking No Knead Artisan Bread, as it creates a steamy environment that helps the bread rise even more and develop a crispy crust. The steam generated inside the Dutch oven mimics the conditions of a professional oven, resulting in bakery-quality bread at home. If a Dutch oven is not available, a tray can be used with a pan of hot water in the oven to create a similar effect.
To achieve big, airy holes in the crumb of the bread, it is important to use a loose dough, high oven temperature, and a preheated pot. The loose dough allows for greater expansion and creates large air pockets during baking. The high oven temperature and preheated pot help create the ideal baking environment to promote oven spring and achieve that desired holey crumb.
Refrigerating the dough before baking is a key step for flavor development. During the slow fermentation process in the refrigerator, starches in the dough are transformed into sugars, resulting in a more flavorful bread with complex notes. The longer the dough is refrigerated, the more pronounced the flavor becomes.
By following these tips, bakers can master the art of making No Knead Artisan Bread and enjoy bakery-quality bread with a fluffy crumb, crispy crust, and rich flavor.
Serving and Enjoying No Knead Artisan Bread
No Knead Artisan Bread is not only delicious on its own but also incredibly versatile when it comes to serving and enjoying. Whether you prefer it fresh out of the oven or as a component of a mouthwatering recipe, this bread will satisfy your cravings. Here are some delightful ways to enjoy No Knead Artisan Bread:
- 1. Fresh Bread: Indulge in the simple pleasure of warm, freshly baked No Knead Artisan Bread. Slather it with butter and experience the heavenly combination of the crusty exterior and soft, chewy crumb.
- 2. Sandwiches: Upgrade your sandwiches by using No Knead Artisan Bread as the base. Its crusty texture adds a satisfying crunch to any filling, making each bite a delightful experience.
- 3. Toasting Bread: Enhance the flavor and texture of No Knead Artisan Bread by toasting it. Whether for breakfast or a snack, the toasted bread provides a delicious and comforting treat that pairs perfectly with various spreads and toppings.
- 4. Pairing with Soups and Stews: Take your soups and stews to the next level by serving them with a side of No Knead Artisan Bread. Use it to soak up the flavorful broth and enjoy the comforting combination of the hearty dish and the crusty bread.
- 5. Bruschetta and Garlic Bread: Get creative in the kitchen and turn No Knead Artisan Bread into a gourmet delight. Use it to make bruschetta, topping it with diced tomatoes, basil, and mozzarella. Or transform it into garlic bread by buttering, seasoning, and toasting it to perfection.
- 6. Grilled Cheese and Cheesy Garlic Bread: Elevate your grilled cheese sandwiches by using No Knead Artisan Bread. Its crust and chewy crumb provide the perfect base for gooey, melty cheese. You can also make cheesy garlic bread by combining melted butter, garlic, and shredded cheese before toasting until golden brown and delicious.
- 7. No Knead Bread Variations: Embrace your creativity and experiment with different variations of No Knead Artisan Bread. Add herbs, cheeses, or other flavorings to the dough to create unique and personalized loaves that suit your taste.
No matter how you choose to enjoy it, No Knead Artisan Bread offers endless possibilities and a delightful homemade experience that will impress your family and friends. Now, let’s explore some tips and tricks to ensure your bread-making journey is a success.
Serving Ideas
| Enjoying Fresh | Enhancing Recipes |
|---|---|
| ⢠Slathered with butter ⢠Warm and comforting ⢠Crusty exterior and chewy crumb | ⢠Sandwiches with a crunch ⢠Toasted for added flavor ⢠Perfect pairing with soups and stews ⢠Gourmet options like bruschetta and garlic bread ⢠Grilled cheese sandwiches or cheesy garlic bread |
Conclusion
No Knead Artisan Bread is the perfect homemade bread recipe for both beginner and experienced bakers. With its minimal effort and forgiving nature, anyone can master the art of artisan bread baking. The bread’s crusty exterior, chewy crumb, and large air pockets make it a true artisanal delight.
Using just basic ingredients and without the need for kneading or a stand mixer, you can easily create bakery-quality bread at home. Simply follow the straightforward steps and enjoy the amazing flavors and textures.
From savoring a warm slice fresh out of the oven to incorporating it into your favorite recipes, No Knead Artisan Bread is a versatile treasure. Its simplicity and delicious results will surely make it a staple in your kitchen. So why wait? Bake your own homemade bread today and experience the joy of creating something truly special.
FAQ
Is No Knead Artisan Bread easy to make?
Yes, No Knead Artisan Bread is a simple and forgiving bread recipe that can be made by beginners or experienced bakers.
What ingredients do I need to make No Knead Artisan Bread?
The basic ingredients for No Knead Artisan Bread include yeast, flour, salt, and water.
Do I need to knead the dough for No Knead Artisan Bread?
No, the recipe doesn’t require kneading or the use of a stand mixer.
How long does the dough need to rise for?
The dough can be left to rise for varying amounts of time, from 2 hours to 3 days.
Can I use all-purpose flour instead of bread flour?
Yes, all-purpose flour can be used instead of bread flour in the recipe.
How do I shape the dough for baking?
After the dough has risen, it is scraped out onto a floured work surface, folded inwards to deflate it, and then reshaped into a round or oval shape.
What can I use instead of a Dutch oven for baking?
If a Dutch oven is not available, a baking tray can be used with a pan of hot water in the oven to create steam.
Why should I allow the bread to cool before slicing it?
Allowing the bread to cool for 10 minutes before slicing ensures even cooking and prevents the bread from becoming too dense.
How can I troubleshoot common issues with the bread not rising?
Troubleshooting tips include adjusting the dough’s environment, such as moving it to a warmer place or refrigerating it for a shorter time.
What should the dough consistency be like?
The dough should be loose and sticky, as this allows for better rise and the development of big air pockets.
Can I add flavorings to the dough?
Yes, you can experiment with different variations by adding herbs, cheeses, or other flavorings to the dough.
How can I enjoy No Knead Artisan Bread?
No Knead Artisan Bread can be enjoyed fresh out of the oven, used for sandwiches, toasted, or paired with soups and stews.
Can I use No Knead Artisan Bread for making bruschetta or garlic bread?
Yes, No Knead Artisan Bread is excellent for making bruschetta or garlic bread, topped with various ingredients like tomatoes, cheese, or herbs.
Is No Knead Artisan Bread a versatile recipe?
Yes, No Knead Artisan Bread is versatile and can be used in any recipe that calls for bread.